Wednesday, April 08, 2009

Messier A and B


Two of my favorite destinations on the moon are the double craters Messier A and B in Mare Fecunditatis. The impact or impacts (read on) must have happened at very low angles because the rays--twin ejecta blankets--point nearly straight west. The hypothesis has been floated that the two craters were produced by a single impactor diving into the lunar surface and then bouncing back out. I'm no geophysicist but that sounds pretty unlikely. Another hypothesis is that a single impactor hit and bounced. Looks like a pretty short bounce for something traveling many miles per second, and it doesn't explain why the two craters have such similar geometry. Given the number of asteroids that are turning up with moons these days, and the frequency with which comets fall apart, a good ole double impact seems much more plausible to me. But that's just my $0.02.

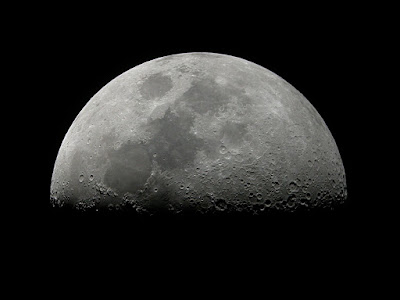
Anyway, it's a pretty sight in telescopes big and small, and well worth a look if you're out looking up. I took the top photo a year ago today, using a 6" reflector and Nikon Coolpix 4500 digital camera. The photo below was taken this April 1 using the same camera and a 90mm Maksutov Cassegrain at a magnification of only 39x, which goes to show that you don't need a big telescope or high magnification to catch this pair of gems. Click photos to embiggify.

Labels: ,

Monday, March 09, 2009

Another dead snapper tale

First, if you haven't already read Darren's awesome post on turning dead animals into skeletons, do so now. Look out for the amazing line, "Stig and I once microwaved a dead cat and the results were outstanding."

That reminded me that I have told the story of one of my dead snappers, but not the other. As far as I can tell, anyway. So here goes.

I was working at the Oklahoma Museum of Natural History as a grad student, and I had put the word out that I was looking for a big dead snapping turtle. A few weeks later, I got a hit. One of the other grad students had been on a hike at the local lake and seen a dead snapper, so he'd pushed it up into a metal culvert to hide it from scavengers, both human and otherwise. A few days later he told my friend and partner-in-crime, Julian (same Julian as in the other snapper story linked above), a few days after that Julian told me, and a few days after that we finally hopping in Julian's truck and went out to get that thing.

Keep in mind that this was May in Oklahoma, when the temperature and the humidity were both hovering in the high 90s. And that the snapper had been up in that culvert for a week and a half by the time Jules and I went after it, and dead for an unknown additional period.

I waded into the ankle-deep water and dragged the thing out of the culvert by the shell. It was huge, with a carapace 15 inches long and a head three inches wide. Weighed upward of 20 pounds. It was also to the "bratwurst" stage of decomposition, in which the head, tail, and all four limbs were extended and swollen up like unholy sausages (the putative existence of holy sausages is a topic for another post). I didn't want to touch the flesh, which had the texture of gelatin and the rich aroma of rotting horse ass. So I tried to gingerly pick it up by the edge of the shell using only the fingertips of my right hand. Bad idea--as I was turning it over, the entire weight of the animal came down on my right thumbnail, cracked it in half, and bent it back at a 90 degree angle from the quick. I howled, dropped the snapper back in the drink, and ran to shore where I gritted my teeth and snapped the broken nail back down over the bleeding quick where it belonged. Only then did I realize that in my haste I had run smack into a little stand of poison ivy, to which I am seriously allergic.

Somehow we got the dead snapper into a couple of trash bags and into the bed of Julian's truck. Then we went back to my place, put it on the back porch, and took turns showering with Technu to get the poison ivy oil off. I also bandaged my thumb, but ended up losing most of the nail anyway. Not fun.

I wasn't sure what to do with the snapper. Our duplex backed up on a big wild plot at the edge of town, and I was tempted to use ants, but I didn't want to expose the thing to scavengers, which were both diverse (raccoons, opossums, coyotes, dogs, etc.) and abundant. I had used maceration for the mummified snapper but the results were awesomely greasy. I was interested in burying it but had no experience with prepping carcasses that way.

The upshot is that I didn't do anything with it for several days, during which it was sitting on my back porch inside two shopping bags in the 90-degree heat. Jules and I had gotten it on a Saturday.

The following Thursday night Vicki and I were on an evening stroll about the neighborhood, about two blocks from home, and the wind changed just right and we could both smell that snapper rotting. Vicki looked at me and sternly said, "You are going to get up tomorrow morning and bury that thing."

I did. It was simply horrific. I opened the trash bags, grabbed the bottom ends, and pulled up. The snapper slid out on its back. Or rather its remains did. All that was left was a greasy articulated skeleton, a couple of gallons of really evil greenish-black fluid, and about a million grains of white rice. Only they weren't grains of rice, they were maggots. The stench hit me like the proverbial freight train.

I dug a hole about a foot deep in the yard, lined the bottom with a plastic trash bag, slid the snapper in with the shovel, buried it, and covered the spot with a few logs from the woodpile. I say it like I just did all that stuff. In fact it took most of an hour because holding my breath I could only work for about 30 seconds at a time, before I had to go to the upwind corner of the yard and just breathe. The stench was beyond anything I have ever experienced before or since. I didn't know that a scent could be that powerful. I hosed down the porch for a long time, too.

All that summer I watered the logs over the burial plot daily. This kept them moist during the long hot summer, when temperatures got over 110 F for a solid month, and hopefully promoted lots of biological activity in the soil below. I flipped the logs daily to collect rolly-pollies (or pill bugs, if you insist) for my baby box turtles. In August I moved the logs and carefully dug up the turtle. Amazingly, the bones were entirely defleshed and degreased. I cleaned them up with soap and water and they came out shiny white, with no bleach or peroxide. I still have the skull, which is beautiful and impressive, and if I wasn't so lazy I would have included a photo of it with this post. Maybe next time.

Anyway, I've been ardently pro-burial for carcass preparation ever since. Give it a shot, it's a great experience.

Labels: , , ,

Thursday, May 15, 2008

Shoot the moon II: Getting the most out of your binoculars


Part the First: Mount Up

The biggest pain in the butt about binoculars is that they shake. Or rather we do, no matter how we may try not to. If you can get rid of the shakes, using binoculars is awesome. But it ain't easy. Up until now I have done one of two things: steadied my binoculars against a nearby fence or wall, or steadied them against a monopod but without having them actually attached, just using the monopod as a sort of primitive mobile fencepost. But recently I came up with a better solution: I built a budget binocular bracket.

Lots of astronomy equipment companies sell dedicated binocular brackets, for mounting binoculars to monopods or tripods. The current issue of Sky & Telescope has a review of a premium model that costs $70. That's more than double the cost of my best pair of binoculars! Even the budget model from Orion costs $30.

Well, bump that. You can build your own for about $5. Go to the hardware store and pick up a steel angle bracket like the one shown in the photo above, some 1/4-20 nuts, and a 1-inch-long 1/4-20 thumbscrew. One of the holes in the bracket will fit over the 1/4-20 bolt on your monopod or tripod. Put on a nut and tighten 'er down. I used needle-nose pliers to get in there and get that nut nice and tight--you don't want your binoculars swinging in the breeze, no matter how cheap they were. Put a couple of nuts on the thumbscrew before you put it through the bracket--these act as spacers and keep the flat end of the thumbscrew from bumping up against the bracket when you tighten the rig. Then stick the thumbscrew through the bracket and screw it into the socket on the front of your binoculars. If the thumbscrew reaches the end of the socket before it's tight, pull it out and slip on one more nut as another spacer--that's what I had to do, and in the photo above you can just see the edge of the nut peeking out between the bracket and the socket on the binoculars.

Bang, you're done. Point the binoculars at something interesting and enjoy a completely shake-free view. I like running them up on my camera tripod and observing the moon without having to touch anything at all. I'm telling you, it's a qualitatively different experience from any binocular observing you've ever done in the past. And not just of astronomical targets--it's good for birds, landscapes, sunsets, your perverted neighbors, whatever.

And it's damn near free. If you use binoculars at all and own a tripod, there's no reason not to build one of these. And my tripod is not fancy--it's the absolute cheapest full-size model that Wal-Mart has to offer. It shakes and wobbles like crazy with a telescope on top, but it's plenty sturdy for a pair of binoculars or a camera.

Part the Second: Absolute basics of image processing


This is, no lie, the un-fiddled-with raw photo of the moon that I took through my Celestron 10x50 UpClose binoculars tonight. Well, okay, not completely un-fiddled-with. I did rotate and crop the image to get the moon in the middle and get rid of most of the empty field. But I didn't mess with any color or sharpness settings, so the moon itself is exactly as it came out of the camera.

I don't like to brag, but I was freaking amazed that I could get a picture that sharp using just binoculars. The 10x50s are quite a bit better than the Tasco 7x35s I used for my last attempt, but still. The image quality of the mounted binoculars is not far behind that of a small telescope, either visually or photographically (proof--compare these pictures to this one). The one advantage of even a small scope is that you can crank up the magnification if you want to see, for example, the rings of Saturn. On the other hand, binoculars are cheaper, lighter, easier to set up, and grab a lot more sky--all the reasons amateur astronomers use them in the first place.

Anyway, this part isn't about the binoculars. It's about what to do once you get a picture.


First thing, seriously, always, is Unsharp Mask. It looks like a gimmick but it's not. It can be overdone, like almost anything, but you should be able to play around with the settings minimally and find something that works. And it's available in just about every serious image processing program out there, including Photoshop and GIMP (the latter is free, BTW). The only difference between the photo immediately above and the one at the top of this section is that I applied Unsharp Mask in GIMP, using the default settings.

You'll notice some distracting color in both of the above images. The north edge of the moon is outlined in blue haze, and the southern end is an unwholesome-looking yellowish brown. That's chromatic aberration, and it's an unavoidable consequence of refracting light through glass. For telescopes you can buy anti-fringing filters, or super- or hyper-expensive apochromatic telescopes that use special kinds of glass to minimize CA, but even the best only knock it down to below the threshold of perception. It's impossible to completely get rid of. Physics is like that sometimes.

Let me amend that. It's impossible to completely get rid of in optical trains with refracting elements. A major advantage of reflecting telescopes is that they collect light with mirrors rather than lenses, so their views are blessedly free of CA.

Interestingly, I've never seen any CA on the moon through binoculars, and I've looked for it. Possibly the weak signal of color falling on my cones is just blown out by the intensity of light falling on my rods. Whatever the explanation, in my experience it is a strictly photographic problem.


This won't work for everything, but the moon is basically black and white in real life so it doesn't look weird if you convert the image to grayscale, as I've done here. And that's all I did--I didn't try to erase the dim halo around the northern regions, for example. It was always dim, and it only grabbed the eye because it was blue. Convert it to dark gray and it just disappears.


One last trick. I nudged up the contrast a little. It's really easy to overdo this, but if it's done right it certainly makes for a more interesting and pleasing image. The main problem with doing this on anything but a full moon is that the area near the terminator--the day/night line, where the lit part of the moon meets the unlit--drops off into blackness, and if you make the blacks blacker, the terminator appears to shift. Suddenly instead of describing a gentle curve or line from pole to pole, it zigs and zags as bright craters and dark maria pull it first one way and then the other. Which makes the photo look fake, because the real moon just doesn't look like that.

But there's an easy fix. Copy the image and paste it into a new layer. Bump up the contrast on that layer, and watch the terminator move. Once the contrast on everything else looks good, grab a big fuzzy eraser and erase the parts that got blackened out. The normally-lit terminator in the original image shows through. Flatten and save. You're done.

And so am I (UPDATE: no I'm not. Keep reading). Like I said, this is the bare bones of image processing. There's lots more here, and in many other places on the web. Have fun!

-------

Hoo boy, what a dumbass I am. The picture above is actually how not to do contrast. I screwed up bigtime, but I'm leaving it in as a teaching tool. There are two big problems with that image, and somehow my poor addled brain didn't catch them until this morning. The first is that I only grabbed part of the image when I copied and pasted, so there is a distinct black box from the contrasty layer visible against the skyglow from the original background. Lesson 1: copy the entire image into the layer you're going to mess with. The second problem is that I colored outside the lines with the eraser, so next to the terminator there is a weird light-colored strip like a fuzzy caterpillar (if you can't see this, try tilting your monitor so the image looks lighter. Lesson 2: if you're going to up the contrast and then erase some of the contrasty layer, you have to be careful not to get off of your foreground target or the brighter background will show through. Both problems are fixed in this version:


I'd like to be able to say that I planned this little goof/save in advance, but I didn't. Just shouldn't process images in a dark room or blog when I'm tired. Sheesh. Keeps me humble.

Now I'm going to take Mike's advice and get back to work. No sarcastic commentary needed.

Labels: , , , ,

Saturday, May 10, 2008

Shoot the moon: digiscoping 101


In a comment on a recent post, TheBrummell said, "Any advice on getting a couple of seconds exposure through 1/2 a pair of binoculars with a Nikon coolpix 5200?" Which may sound like a crazy question. Most of us own a pair of binoculars and a camera, but I'll reckon the fraction that have used the two in conjunction is vanishingly small.

I, however, am a member of this elite group. And I realized that although I have blogged the results of my digiscoping adventures here*, I haven't actually explained anything about the process, or given any instructions for doing it yourself. So here goes.

* A lot; possibly too much for those of you who came here hoping in vain for something paleo-related, but now that I have to feed SV-POW! regularly I send most of my paleo ramblings there.

What Digiscoping Is

Afocal projection photography, also known as digiscoping amongst birders and as white trash astrophotography by me, is the simplest and cheapest way of taking pictures using any kind of optical device: you just hold the camera up to the eyepiece and snap away. You can do it with just about anything. TheBrummell reports taking zillions of pictures through dissecting microscopes, my anatomy students take pictures of prepared slides through the compound microscopes in the teaching lab, birders and other nature lovers use spotting scopes or, less frequently, binoculars, and amateur astronomers use telescopes. The results can be striking--do a Google image search for 'digiscoped bird' and you'll see what I mean. The picture at the top of the post is my best image from 8 months of experimentation. Click on it for the full-size version, and check out the detail.

Okay, that's the what. What about the how?

Holding the Camera Steady

I use a Nikon Coolpix 4500, and for almost all of my pictures I really have just held the camera up to the eyepiece of whatever I'm shooting through. For steadier results you could put the camera on a tripod, or buy a dedicated adapter for mounting the camera behind the eyepiece, like the Steadypix from Orion (image from Orion's website).
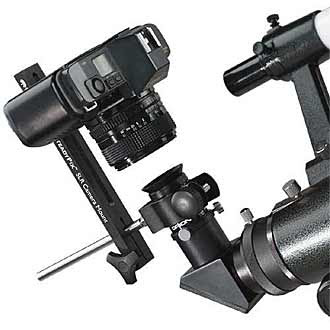

I have also started experimenting with the camera on a monopod, which is what I used for the recent Earthshine photo. The monopod is nice because it's simple, lightweight, easily adjustable to any length, but sturdy enough to really damp out the little vibrations that you can't escape just because you're alive. (When I'm really trying to hold the camera still I can see my hands move ever so slightly in time with my pulse. Try it.) And mine was dirt cheap, something like $18.

An unexpected benefit of using a monopod is that it helps dampen out the shakes even when it's not on the ground, just by being long and heavy (relative to the camera). I discovered this when I was taking pictures in the OMNH last year and I wanted a tall-aspect photo, so I just picked up the camera plus monopod and flipped the whole rig on its side. The rig was easier to keep steady than the camera by itself, even when it wasn't propped against anything (you can sometimes prop a sideways monopod against a nearby wall, too).

Camera Settings

For settings I use macro mode, sometimes with a timer to eliminate the little bit of shake from manually pressing the shutter release. And I usually zoom in to eliminate vignetting, which is the "stopping down" of the image by the margins of the optical assembly (usually the field lens of the eyepiece). Here's what an unmodified vignetted image looks like:
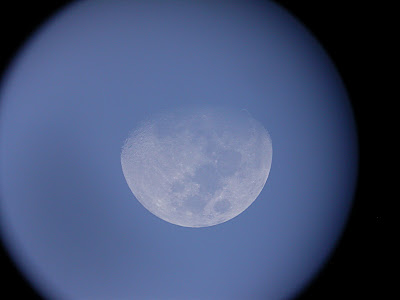

Here's the same image rotated, cropped, and sharpened:


Vignetting is not a problem when I'm shooting at night, because the black margin does not show up against the dark sky. The settings I use to shoot the moon and planets don't usually show any stars anyway. If you want pictures of starfields, you'd be better off using a DSLR by itself--there are plenty of tutorials around that will explain how, and lots of camera-specific forums you can check out for advice and assistance.

Magnification

Zooming in can also boost the magnification significantly. Magnification of any optical device is equal to the focal length of the objective divided by the focal length of the eyepiece. So a 25mm eyepiece will yield 40x in a telescope with a 1 meter focal length, but only 20x in a telescope with a 500 mm focal length. It is hard to get up to high magnifications with small refractors or Newtonian reflectors just because of that fact. Catadioptric telescopes like Schmidt-Cassegrains and Maksutovs have the opposite problem--their folded light paths mean that very small telescopes have very long focal lengths, and even fairly long-focal-length eyepieces still yield fairly high magnifications. For example, I have an Orion Apex 90 Maksutov-Cassegrain, and the tube is four inches in diameter and less than a foot long--which makes it a good travel telescope, because it fits in a carry-on bag with room to spare--but the focal length is 1250 mm, longer than my "big" telescope, a 6-inch Dob (see below).

So, two points. First, contrary to what most people think, the main point of a telescope is light collection, not magnification. A lot of astronomical objects are big but dim, like galaxies and nebulae. Some magnification is helpful, for sure, but the main benefit of the telescope is that it's light-collecting area is vast compared to that of the naked human eye. I've blogged about this before and I won't beat it to death here.

On the other hand, a good digital camera can pull more detail out of the scene than can your eye, thanks to the zoom. I took the photo at the top of the post at a telescopic magnification of 37x and a camera magnification between 2-3x. Which means my eye saw the moon magnified 37 times, and the camera saw it magnified somewhere between 74x and 111x, and recorded that. I have a 16x20 inch print of that image ($9.99 at Costco, and 12x18s are only $2.99!), and the detail holds up even at that size, which is waaay beyond what I can see with the naked eye at 37x.

Almost all of my moon photos have been taken at low telescopic magnification. The only exceptions are closeups of just part of the moon, like the second pic down here. I am usually forced to use low magnification for the whole-moon shots, just to get the whole moon into the field of view at once.

Exposure Time

Although my Coolpix autofocuses just fine, it's not so hot on figuring out exposure times for small bright objects in a sea of inky blackness. So I go over to manual for most stuff now. Here's why this matters--these photos were taken about a minute apart, but the one of the left is a two-second exposure and the one on the right is a 1/15 second exposure.
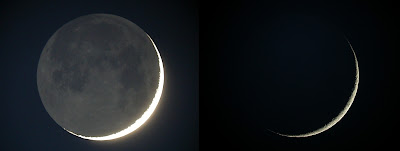

The moon varies in brightness a lot. If it's full or nearly full, I may use exposure times as short as 1/250 second or even 1/500 second. And obviously exposure time and camera steadiness are related--the shorter the exposure time, the less you have to worry about the shakes.

What To Shoot

Digiscopers with an astronomical bent have a limited choice of targets. Basically, the moon, the bright planets, and any evening or nighttime scenes you want to see really close up. Starfields are better imaged without a telescope, or with a long-exposure photo on a tracking mount, which is a whole 'nother kettle of (much more expensive) fish. Nebulas, clusters, and galaxies are too dim. You can image those things with simple webcams, but I'm not going to blog about that because I don't have any experience doing it. Yet. (My birthday is coming.)

Still, the moon and planets are pretty great. It is easy to forget that moon is an entire world. Yeah, airless and dead, but still: a whole world. And it's right there. Even cheap binoculars will show you tons of details that you can't see with the naked eye.

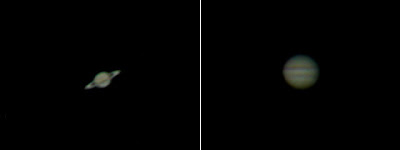
So far, the only planets I've shot are Saturn and Jupiter. The results are not going to make APOD, but you can make out cloud belts, rings, and the Great Red Spot, which is pretty amazing considering the entire operation consisted of holding the camera up to the eyepiece and pushing the button.

What To Shoot Through

Whatever you have. Seriously. Experimentation costs nothing, it's fun, and any result you get will probably be better than what your naked eye could have served up. So go nuts.

But if you want some advice, bigger is better. In the case of a large, bright target like the entire moon, the advantage of big optics is neither light-gathering nor magnification but resolving power. Compare these photos from similar phases but taken through scopes of different apertures:
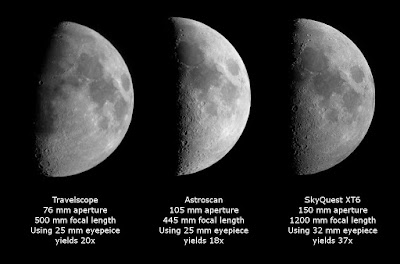

Note that the middle photo was actually taken at slightly lower magnification than the one on the left, but the resolution is far superior. Here's what those scopes look like in real life:
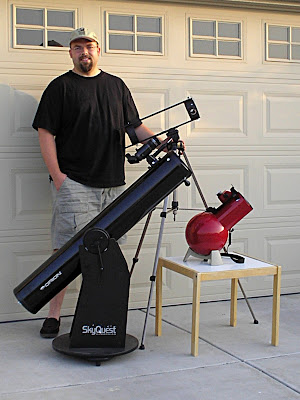

The travelscope is the skeletal thing perched on the tripod. It's currently in its third incarnation, or fourth if you count its ignoble birth as a National Geographic toy (you can read my thoughts on the utility of the original product and the ethics of its marketing here). Previous evolutionary stages are here and here. The red ball-type scope on the table is my Edmund Astroscan, object of my desire since I was about 12 and my primary scope for car trips. The black howitzer-looking thing is my Orion SkyQuest XT6, a Newtonian reflector like the others, but on a Dobsonian or "Dob" mount. It's actually a lot more imposing in person--the tube is four feet long and seven inches in diameter, and the whole thing weighs 35 lbs. It just looks small next to me, which is an occupational hazard for us sasquatchi. And it does look suspiciously like a weapon, which often gets me weird looks from the neighbors and passersby when I set it up out front. So I invite them over to have a look through it, which is a great way to make someone's day.

I have done most of my digiscoping through the XT6, at first because it was my only telescope. I went through a phase this spring of shooting through the Astroscan, because it is so small and portable. I can sling it over one shoulder, put the camera over the other, stuff a couple of eyepieces in my pockets and be outside observing in about a minute and a half. But the images served up by the Astroscan are just a little mushy compared to those from the XT6, probably because of the fast optics--f/4.4 is a steep light cone. For a while it was kind of an enjoyable challenge to see how well I could do with the Astroscan, but pretty soon I got tired of really working for so-so images when I could get better ones for less effort through the XT6.

And by "so-so", I mean only by comparison to the images I'd already been getting through the XT6. I'm actually quite proud of some of my Astroscan photos, and I don't mean to knock the little scope at all. But Aperture Rules. I'm sure if I had a 10-inch scope to play with, I'd stop digiscoping with the XT6.

Which brings up the question of why I have so many telescopes (the Apex 90 I mentioned earlier in the post is not in the above photo, nor is the Explorascope I mention below). Partly it's because I'm a telescope nut, but partly it's because different scopes serve different purposes. The XT6 is both my default scope and my big gun. If I'm home and I want to do some serious observing or digiscoping, that's what I use. The Astroscan is my grab-n-go or quick look scope, my car travel scope, and the scope I share with my little boy. The travelscope, Apex 90, and Explorascope are all contenders in my quest for the perfect airline portable scope. And anyway, according to Ed Ting one really needs six scopes, so I'm still under the legal limit.

But wait, you say, why am I blabbing on about telescopes when TheBrummell specifically asked about

Binoculars

Yes, you can take pictures through binoculars. It takes some forethought. The first problem is mounting them. Almost all binoculars have a mounting socket at the front of the center column, usually covered by a plastic cap. Lots of astronomy and camera stores sell dedicated tripod adapters, which are L-shaped rigs with a 1/4-20 bolt on the vertical side to screw into the binoculars, and a 1/4-20 socket in the base for the tripod bolt to screw into. You could also make your own out of 1/4-20 thumbscrews and scrap lumber for about two dollars. UPDATE: a five-dollar solution is shown in the next post.

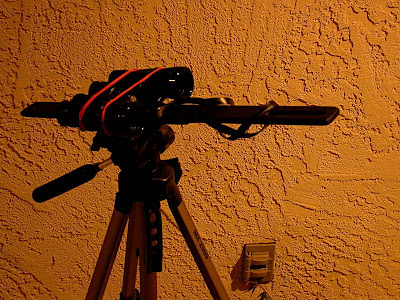
But that's not what I did. In my one adventure in binocular digiscoping, I used the Tasco 7x35s that I bought back in high school (or maybe even junior high). They have a mounting socket, but it's not a standard size, and I don't have a binocular adapter anyway. But I still got them mounted to the tripod. I used one of the struts from the travelscope, which has an inset 1/4-20 T-nut for tripod attachment, and simply lashed the binoculars to the strut with big rubber bands. It looked weird as hell:

How did it work out? Not too bad, actually. I had to squat down and put my head right next to the travelscope strut to sight the things in, but the focuser worked fine and I didn't have any problems taking pictures. I went a little nuts that night taking pictures of the same moon through several devices or none at all, in anticipation of writing this very post. Here's the comparison shot:
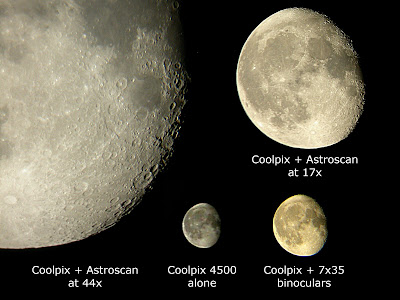

UPDATE: Gah! Better binocular photos now available, again in the next post.

The only real surprise in putting this together is how well the Coolpix did by itself, using maximum zoom and steadying the camera against one of the columns on the back porch.

To Shoot or Not To Shoot

I actually feel like kind of a weiner putting up the binocular shot here at the end, after having kicked off the post with a picture that is far better than you're ever going to get through binoculars. I'm not trying to discourage you--quite the contrary! The first time you get a nice, reasonably sharp photo of your own, it will feel pretty damn good. And it will hopefully make you want to do more.

I am always telling people that getting started in astronomy does not have to be prohibitively expensive. Even cheap binoculars will show you tons of stuff you can't see with the naked eye (especially if they're mounted on something), and not just on the moon. All of the Messier objects are visible in binoculars in dark skies, and most serious amateur astronomers spend at least part of their time observing with binoculars. Orion has several good beginner telescopes in the $100-250 range, a new Astroscan will run you $199 but used ones can be had for a little more than half that if you look around, and an XT6 is $269. But right now you can buy a workable telescope for about the same price as a modest pair of binoculars: Celestron's Explorascope, an 80 mm reflector, is on sale for under $40. Eighty mm is not much, and you won't get any XT6-worthy pictures through it, but the views will be closer to those through a six-inch scope than to those served up by binoculars (at least at higher magnifications; at low mag, maybe not). So if you've been reading and wondering if you'd get anything out of owning a telescope, now's a good time to find out without breaking the bank. I've got one in the mail, and I'll review it here once I get a chance to test it out.

Clear skies.

Labels: , ,

Wednesday, April 09, 2008

Why we can see unimaginably distant galaxies from Earth, but not the moon landers


Recent Correspondent: We know where the guys langed on the Sea of Tranquility (and the other missions too of course, not just 11), and though small, they left behind a lander and moon rover etc. So, I assume with a big enough telescope (and we have some monsters) we could just hunt around a bit, and actually *see* where we landed - right?

Me: Sorry, it's a good thought, but the landers and so on that we left behind are waaay too small to be seen by any telescope on earth or in orbit.

Recent Correspondent: I must say I am surprised. We have these scopes that appear to be able to see tiny little planets in other galaxies. I know that is a big object, but it is a shit load further away. I figured the size vs distance would be on the side of the lander...

When I replied, I was just repeating what I've read lots of places. I've never seen anyone actually demonstrate that it's true. So I am endeavoring to do so now. There are a couple of things to clear up here. The first is the discovery of extrasolar planets around other stars, and the second is whether size vs. distance is on the side of the moon landers, or the unimaginably distant galaxies.

Part 1: Extrasolar planets

We have not seen tiny little planets in other galaxies. There is a literally vast confusion of scale here. The most distant extrasolar planet discovered to date, OGLE-2005-BLG-390Lb, is only 21,000 light years away. On one hand, that is a hell of a long way away. Our ancestors were hunting down the last mainland mammoths when light from that planet's primary was barely halfway here. On the other hand, it's nothing. The Milky Way is estimated to be about 100,000 light years across, so OGLE-2005-BLG-390Lb is only a fifth of the way across our own galaxy. The closest major galaxy to the Milky Way--excluding our dwarf satellite galaxies, like the Magellanic Clouds--is the Andromeda galaxy, which is 2.5 million light years away. It is the most distant object that you can see with the naked eye, which is pretty cool, because the photons that fall into your unaugmented retina left Andromeda when our ancestors were banging rocks and dreaming of taming fire. But it is more than 100 times as distant as OGLE-2005-BLG-390Lb.

It gets worse. Nobody from Earth has seen OGLE-2005-BLG-390Lb. We only know it's there because of gravitational microlensing. The most distant planet we've actually seen is 2M1207b, if it actually is a planet and not some kind of dwarf star, and it's only 173 light years away.
In other news, the "hot Jupiter" that orbits HD 189733 has methane and water in its atmosphere. Here's how we know that. The planet above is not extrasolar; it's wholly terrestrial in origin.

So to sum up, all of the extrasolar planets we've found are in our own galaxy, and pretty close even on a galactic scale, and we've only directly imaged one of them, and the one we've imaged may be more of a failed star than a planet.

Part 2: Which is smaller, the Eagle or a smudge in the HUDF?

The Apollo Lunar Modules are about 14 feet in diameter, with a maximum landing gear spread of about 30 feet. At its closest approach, the moon is 225,000 miles away, or about 1.19 billion feet. So the ratio of size to distance is 1:40 million even if we use the landing gear spread, and 1:80 million if we use the vehicle itself.


The Apollo 17 lander was actually photographed from lunar orbit, but that's a distance of about 69 miles, not 225,000 miles. And it shows up as a single pixel, plus a pixel of shadow. You can see that photo, along with tons of cool zoomable moon landing site photos, here.


Although there are galaxies somewhat larger and much smaller than the Milky Way, let's say for the sake of argument that most galaxies are about 100,000 light years across. The most distant galaxies ever imaged, in the Hubble Ultra Deep Field (shown above), are about 13 billion light years away. Which yields a ratio of size to distance of only 1:130,000, or about 300 times bigger than the moon landers to observers on Earth or in Earth orbit.

Which is why we can see galaxies on the other side of the universe from Earth, but not our own moon landers. The galaxies are indeed shitloads further away, but they are also many, many shitloads larger.

Feel free to poke holes in my math or logic.

Labels: , , ,

Sunday, March 23, 2008

Dr. Vector's EXPLODING BRAINS Breakfast Massacre


Inspired by TheBrummell's Bachelor Chow, I present the first of my Dude Food recipes: Dr. Vector's EXPLODING BRAINS Breakfast Massacre. I know you just saw the full name in the title, but it's fun to say, and you're at my mercy, so: Dr. Vector's EXPLODING BRAINS Breakfast Massacre.

Ingredients for Dr. Vector's EXPLODING BRAINS Breakfast Massacre

bacon
frozen tater tots
bear grease (or olive oil)
garlic salt
black pepper
eggs
Worchestershire sauce
cheese
picante sauce
barbeque sauce
horseradish sauce
HP brown sauce (if available)

Instructions for Dr. Vector's EXPLODING BRAINS Breakfast Massacre

1. Fry the bacon to taste. I like mine flexible, but some folks prefer crunchy and that is very much in the spirit of the dish. Set it aside.

2. Throw the frozen tater tots into the bacon grease. Supplement with olive oil if there's not enough grease to get the job done, and if the tub of bear grease in your coldhouse is empty (ya wuss). As the tater tots thaw out, they'll start to fall apart. If you're moving them around with a fork or a spatula, you'll notice that the little tater bits start falling off the end, like those little white balls out of cheap styrofoam. Now you should be able to use your cooking implement to bust 'em apart and make hash browns out of them (you can skip this step if you started out with some form of diced potatoes, Mr. Fancy Pants). Season with whatever you like and fry 'em up. I prefer garlic salt and plain black pepper, but it's a free range, so do what you like. When the hash browns are done, scrape them off and set them aside.

3. Scramble some eggs. I like mine with the usual, garlic salt and black pepper, and a liberal splash of Worchestershire sauce. When the eggs are nearly done, hit them with the cheese. Let the cheese melt a little, then turn the whole mess over a couple of times so everything gets good and intertwingled.

4. Now it's time to start building the breakfast Frankenstein. Pile the cheesy eggs and hashbrowns on a plate. Chop or crumble the bacon and mix it in. Now top liberally--nay, excessively, as if your condiment bottles have Ebola and are crashing and bleeding out--with picante sauce, barbeque sauce, and horseradish sauce, and mix it all up. I used Pace, Bull's Eye, and whatever was in the fridge, respectively. If I'd been in England, I would have added some HP brown sauce. That stuff is awesome.

5. Feed! You don't have to watch Reanimator, Dead Alive, Slither, or Planet Terror while you feast, but that's also very much in the spirit of the dish, and is officially condoned by the Vector Institute of Advanced Gastronomy by Rank Amateurs. Also, depending on your location and level of health, you may be able to save some time by just calling 911 before commencing gustation.

Why is it called Dr. Vector's EXPLODING BRAINS Breakfast Massacre? Because if you've done your job right--mainly by jacking up the condiment level in Step 4 to Ludicrous Speed--the resulting mess looks exactly like somebody blew a zombie's brains out all over your plate. And also because if anyone is watching you cook, their brains will probably explode during Step 4. And because when you get your first taste of the bacony eggy cheesy potatoey Worcestery picantey barbequey horseradishy peppery salty sweet spicy flavor supernova, your brain will also explode. Guaranteed or your money back.

But especially because I am a Tenacious D fan, for miles on to Zanzibar.

Labels: , ,

Monday, October 29, 2007

Bored? Go see a comet!

Using this handy-dandy guide, prepared by yours truly. Printable at 8.5x11", or whatever suits your fancy. Feel free to disseminate it widely, too.


Labels: ,

Saturday, September 29, 2007

Dr Vector discovers the universe

I've mentioned here before Abrell & Thompson's wonderful little book, Moses May Have Been an Apache, a collection of bogus and no-so-bogus "Actual Facts" based on their newspaper cartoon of the same name. One of the entries has a surprisingly evocative doodle of an American Indian GI, and reads, "Charlie Medicine Horn discovered Germany in April, 1945."

Ha ha.

But there's something to that. It does not matter to me that I was not the first to stand in front of the Wall at Dinosaur National Monument, or wander through Beijing's Forbidden City, or hike the beaches on the Isle of Wight. The fact that thousands or millions of people have done those things before did not decrease the thrill of personal discovery for me.

Tonight I found the Galilean moons of Jupiter for the first time by myself. Now, people have been looking at them for 397 years, and our robots have sent back enough data on those worlds to keep a generation of planetary scientists very busy. I had even seen them before with my own eyes, through my astronomy professor's telescope in high school. But tonight was the first time that I found them for myself. And I didn't even need a telescope to see them. Some crappy Tasco 7x35 binoculars that I bought back in high school, steadied against a lamp pole, did the job.

It helps if you know where to look, of course. From our viewpoint Jupiter travels along the same track as the sun and the moon (the ecliptic), and it trails the sun by a couple of hours. Go outside right after sunset and look to the south-southwest, about 25 degrees above the horizon (spread the pinky and thumb of one hand as far as you can at arm's length; that's about 25 degrees). Jupiter will be the first 'star' you see, and it will be a lot brighter than any other stars in that part of the sky once they come out. With the naked eye it looks just like a bright star, but even at 7x magnification you can see a tiny crescent. If your eyes are moderately dark-adapted and you steady the binoculars against something, you will see tiny pinpricks of light near the crescent. Those are the Galilean moons. It may help to focus your vision on some other part of the field of view at first, a technique called averted vision, which helps you detect faint objects.


I had a little help from Stellarium, an open-source planetarium program that you can download for free. You can view the sky from any point on Earth (Wikipedia will give you your latitude and longitude if you don't already know them), and the program is a cinch to navigate. Here's a screenshot from Merced at 7:17 Pacific Time this evening, which I punched up earlier today to figure out where to look. You can turn everything on and off: the grids (alt-az and equatorial), atmosphere, constellation names and lines, and in fact the Earth itself if you want to look straight down and see what folks at the antipodes are seeing. Here I have the alt-az grid and the atmosphere on to show what the sky actually looked like at 7:17 tonight, and where Jupiter was located relative to the cardinal directions and the horizon.

In fact, I did not see all four Galilean moons, just two off the left flank of Jupiter. The chart in this month's Sky & Telescope says those two are Callisto (next to Jupiter) and Io (next one over). Ganymede should be farther off to the left but I didn't see it, and Europa is behind Jupiter tonight. Here's what it looked like through the binoculars:


Now, this is not an awesome spectacle of Nature's grandeur. It's a tiny crescent and two pinpricks almost at the limit of vision. What is awesome is not the size or detail of the view, it's that I got it all, standing under a (blessedly dim and yellow) streetlight with a pair of low-end department store binoculars.

I'll bet most of you have at least some lousy binoculars laying around; many of you probably have a nice pair gathering dust in the closet. Why don't you go outside tomorrow night and discover Jupiter's moons for yourself?

UPDATE: Erp. I couldn't actually have seen a crescent Jupiter. No one has, not with their own eyes. Jupiter is so far out that we are practically right next to the Sun compared to it; therefore we only ever see the lighted face. Anything less can only be seen by space probes. So what did I see? Some kind of aberration that my brain interpreted as a crescent. Three possible causes include lens flare in the binoculars, some other kind of visual aberration in the binos, and astigmatism in my eyes (I wasn't wearing glasses at the time). Percival Lowell ain't got nuthin' on me.

Still, after more than a week of almost nightly binocular viewing, the Gallilean moons are still pretty freakin' sweet.

Labels: , ,

Friday, June 08, 2007

Putting my money where my open access mouth is

Oh, geez, now that I see it on the page that doesn't look wholesome at all.

No, no, this isn't a post about a new profession as a man-whore (I refuse to blog about that). It's about my theses--BS, MS, and PhD--and the fact that they are now freely available to all. Even the unpublished parts of my diss. I guess if we see a New Mexico Museum bulletin on dinosaur air sacs my naivete will be revealed.

Many thanks to my webmaster, Mike Taylor, whom I owe an improbable amount of good sushi for keeping up my other web presence.

Dr. Vector Sets 'Em Straight: Naming New Taxa Edition

I have to get something off my chest. It is just flat stupid when people name new taxa in theses and dissertations. Let me immediately qualify that: it is just fine to describe new taxa in theses and dissertations. Encouraged, actually. It's a wonderful learning experience. Just don't stick the actual name in. Always in motion is the future, and frankly you don't know for certain whether you are going to get around to publishing the new taxon, or perhaps get creamed by a Mac truck while you cross the road to rescue a kitten. And if you choose the kitten / gruesome death route, or simply get sidetracked by family responsibilities, a job, or whatever, then we'll be stuck with another one of these crappy situations in which a taxon named in a thesis is not properly established in the literature. Maybe never, maybe just not for a long time (Neuquensaurus, anyone?).

Look, I don't mean to beat my chest about how completely awesome I am, but sometimes it just can't be avoided. Here's the Systematic Paleontology section from my undergraduate thesis:

Order SAURISCHIA Seeley 1888
Suborder SAUROPODOMORPHA Huene 1932
Infraorder SAUROPODA Marsh 1878
Family BRACHIOSAURIDAE Riggs 1904
Gen. et sp. nov.
[name to be added in formal publication]

See what I did there? The whole thesis is as close to submission-ready as I could make it*, with this one little difference. Oh, and in the text of the thesis I referred to the animal by the holotype specimen number instead of by the name. That's it.

* The reason it looked so different when it finally came out is that it had been chopped down, reformatted, reviewed three times, and rejected twice before it saw the light of day. Also, I had gotten access to a CT scanner, and that changed things a bit too. Tell you all about it later.

Okay, I can't really take credit for that, Rich Cifelli told me to do it that way. But now I've told you, and you can tell others, and pretty soon this whole problem will be cleared up forever.

Next post: how to fix global warming and prevent dust-bunnies from forming under the couch.

Labels: , , ,

Wednesday, July 26, 2006

Dr. Vector, Maker of Worlds


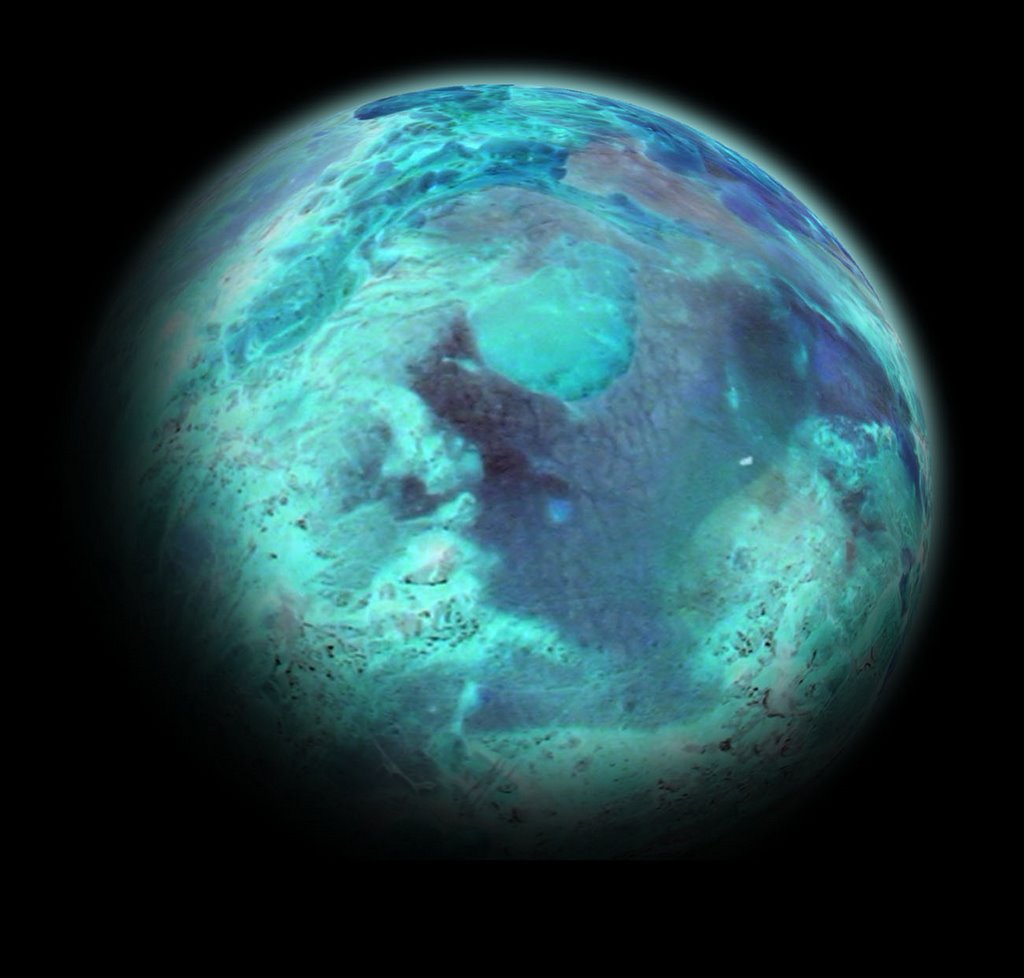
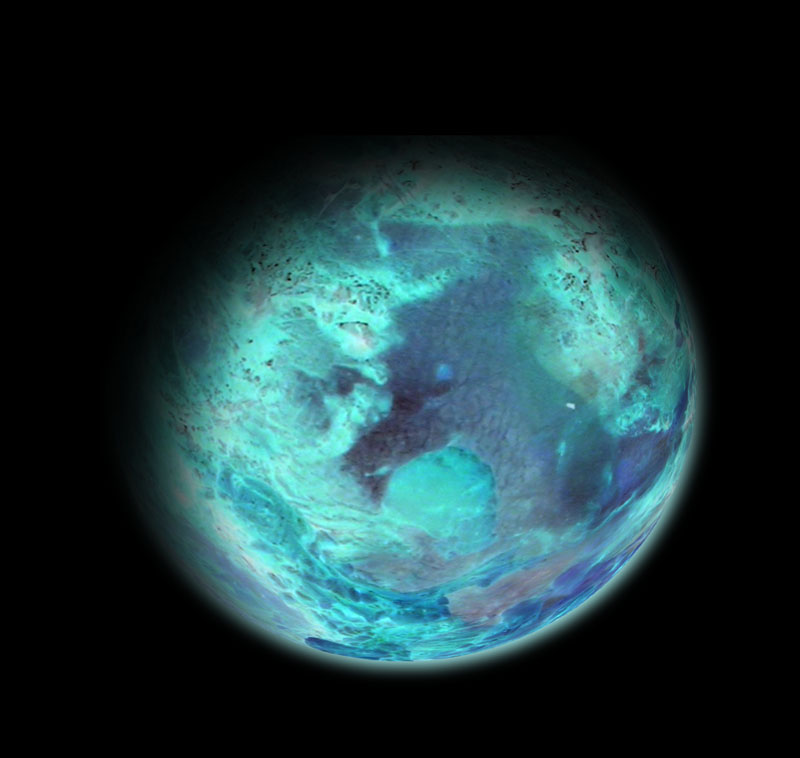
A few weeks ago I found this badass Photoshop tutorial on how to make planets (another similar tutorial is here). Using a shortened version of the programme outlined in the tutorial, I made the icy planet shown above, with its swirling clouds, ocean basins, and ice packs, in about 10 minutes. And I made it from a gory photo of a skinned emu. This post is a step-by-step explanation of how I did it.

Note: this post is NOT intended as a replacement for the tutorials linked above. I took a lot of shortcuts, so this is at best a sort of "planets for dummies". But really I just want to explain how I made this yucky thing (below) into that beautiful planet.

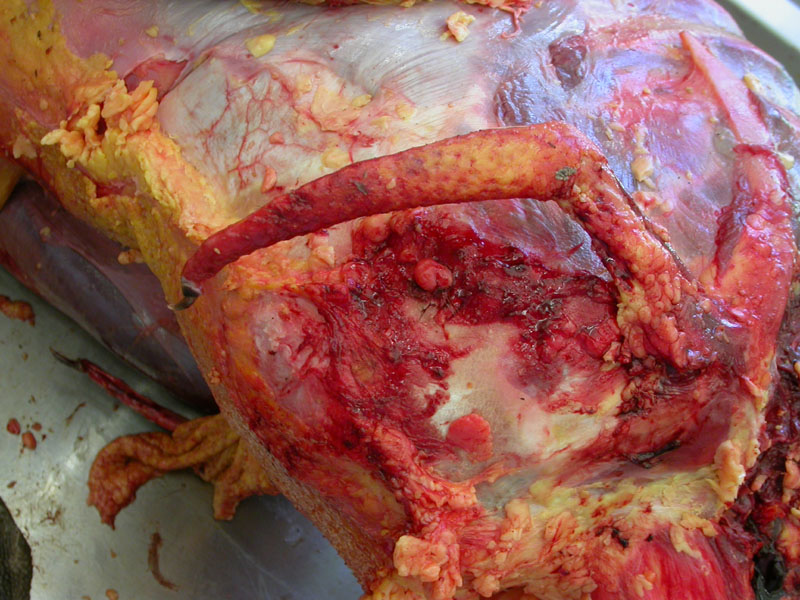
A couple of years ago I got to scrub in and assist on the dissection of an emu. Here is a photo of the skinned right wing (complete with claw) and chest. The neck is out of sight at the bottom of the image, and the sternum forms the contour of the chest on the left side of the picture. This was the 8th planet I attempted, so I had developed a little bit of an eye for interesting textures.

Oh, I did all of this in Photoshop 5.5, which is pretty outdated but still good enough for everything I need to do. You should be able to do the same operations in other programs, and in fact there are several ways to do most of these things even in Photoshop. The first step is to use the circular marquee tool to select the region that is going to become your planet. In this case, I chose the ventrolateral wall of the chest, just forward of and below the wing. Copy that, paste it into a new layer, crop the background, and set it to black.

The step that makes a circular selection into a planet: spherize, and then spherize again (under Filters). Now I've got Planet Carcass. Yuck.

But by inverting the colors, I instantly got the planet. What is that, like 10 steps? Marquee, copy, paste, select background, clear to black, crop, spherize, spherize again, invert. That's it. Nine steps, and I've got a pretty good looking planet. If you want an evenly-lit, no-atmosphere-having rock, you're done.

There are lots of ways to get an atmosphere. My way is fast and easy, but it is admittedly not as sophisticated as the method outlined in the tutorial, nor does it yield the same results. But for my purposes, it's good enough.

The first step is to duplicate the planet layer, and move the new layer, named "Atmosphere", under the planet. I used the Numeric Transform to blow it up to 102%. Then I dropped the contrast and upped the brightness to get a white circle. That's what you see here: the planet sitting on top of a slightly-larger white circle.

Then you fill the white circle with whatever color you want your atmosphere to be (if the atmosphere isn't at least close to the dominant color of the planet, it looks pretty weird). The final step is to apply a Gaussian blur (another filter). You can fiddle with the specifications of the blur to get the atmosphere to stand out farther from the planet or pull it in tighter. I like a tighter atmosphere, because a big atmosphere glow (a) makes the planet look small, and (2) IMHO looks fake.

The final step is the shadow. Again, there are about a zillion ways to do this. Here's how I got mine. I made another layer on top of the planet and atmosphere layers and filled it with black. Then I created a huge-ass brush with very soft edges (low hardness) and just punched a planet-sized hole in the black layer. Then I dragged the shadow layer off center. This is kind of a fun step--you can drag the shadow around and decide which limb of your planet looks best. I liked the blue ocean area at the bottom of my planet, so I dragged the hole in that direction. But we're used to seeing things lit from above, so I flipped the picture over to make the final version shown at the beginning of the post.

That's it. Go make your own!

Labels: , , ,

Sunday, July 23, 2006

Building the Thunderhawk

Rockets have been on my mind because last week I got an announcement about a rocket launch coming up this Saturday at a park here in Berkeley.

Naturally, being the awesome but busy guy that I am, I had a few unbuilt kits in the closet collecting dust. So I pulled them out and started thinking about interesting ways to combine them. I am building a big-ass starfighter, and I'm calling it the Thunderhawk. Estes had a kit back in the day called the Thunderhawk, but I don't care. It was not worthy of the name. If you want to give something a name that is so sweet that makes you a little sick just to think about it, I think Thunderhawk is about as good as it gets. My rocket is definitely going to be worthy.

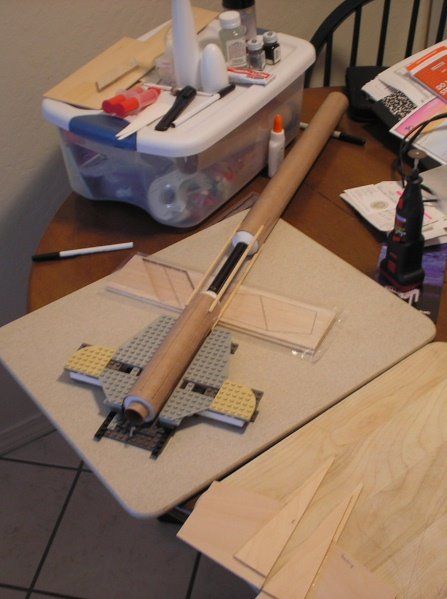
I haven't built a rocket in maybe 15 years. This is the most complicated model I've ever attempted, not least because I'm making it up as I go along, and most of the parts are made from scratch. The body tubes came from three Estes kits: a Screamin' Mimi, a Baby Bertha, and the Sith Infiltrator that I picked up on clearance for five bucks before we moved from Oklahoma. I cut down the nose cones from the Mimi and the Bertha to make the connectors. The fuselage braces, guns, and fins are almost all made from scratch using dowel rods and basswood stock, although I did chop some of the Mimi's fins into new shapes.

My three best friends in this enterprise have been my Dremel, good for cutting and power-sanding small parts; my Legos, good for building custom fin alignment rigs; and some cardstock, also good for building fin supports.

Here you can see the completed fuselage (the engine mount is sticking out at the bottom) sitting in the alignment rig for the main wings.

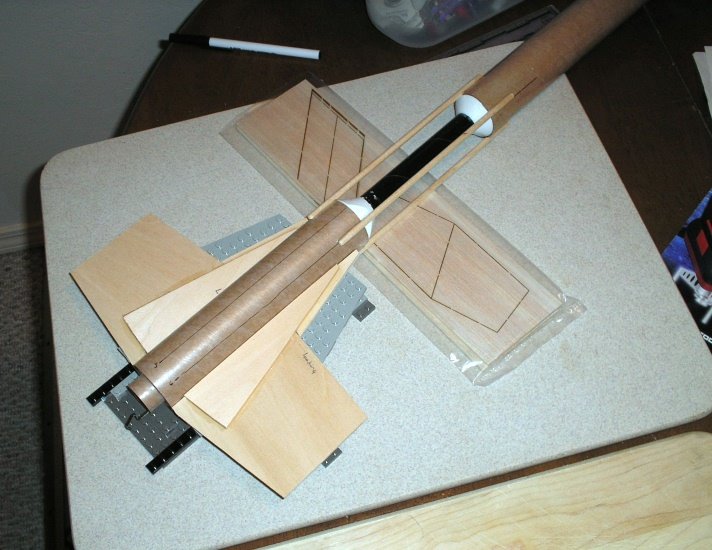
And here are the wings in place while the glue dries. The main wings are made from 3/16" basswood stock from the local hobby store and laminated for strength.

At the end of the main wings there will be vertical fins with smaller fins canted in at the top and bottom, sorta like a TIE Interceptor or a Gunstar. This is another Lego rig I built to hold those fins in place while they set up.

Lots going on here. The fuselage is laying on its side in the new Lego drydock. You can see that I've added additional pods on the top and bottom and small canard wings in front of the fuselage transition. The completed wing/gun combos are laying in front, waiting to be glued on.


Here's a closeup of the back end with one of the wing/gun combos in place. The white pillars are cardstock supports.

I still have a lot to do. I have to finish the other wing, cut down a breath mint container to make a cockpit canopy (no kidding), cut up some small dowels to make pipes for detailing, seal the fins, spray paint the thing, detail paint it, and put on decals, which I'll have to kitbash from something else.

Still, I'm having a hell of a lot of fun, and it should be a kickass rocket when I'm through. Stay tuned.

Incidentally, if you're still in the dark about why model rocketry is cool, go to this site and watch some the videos.

Labels: , ,

Thursday, May 18, 2006

Piling on the tetrapods


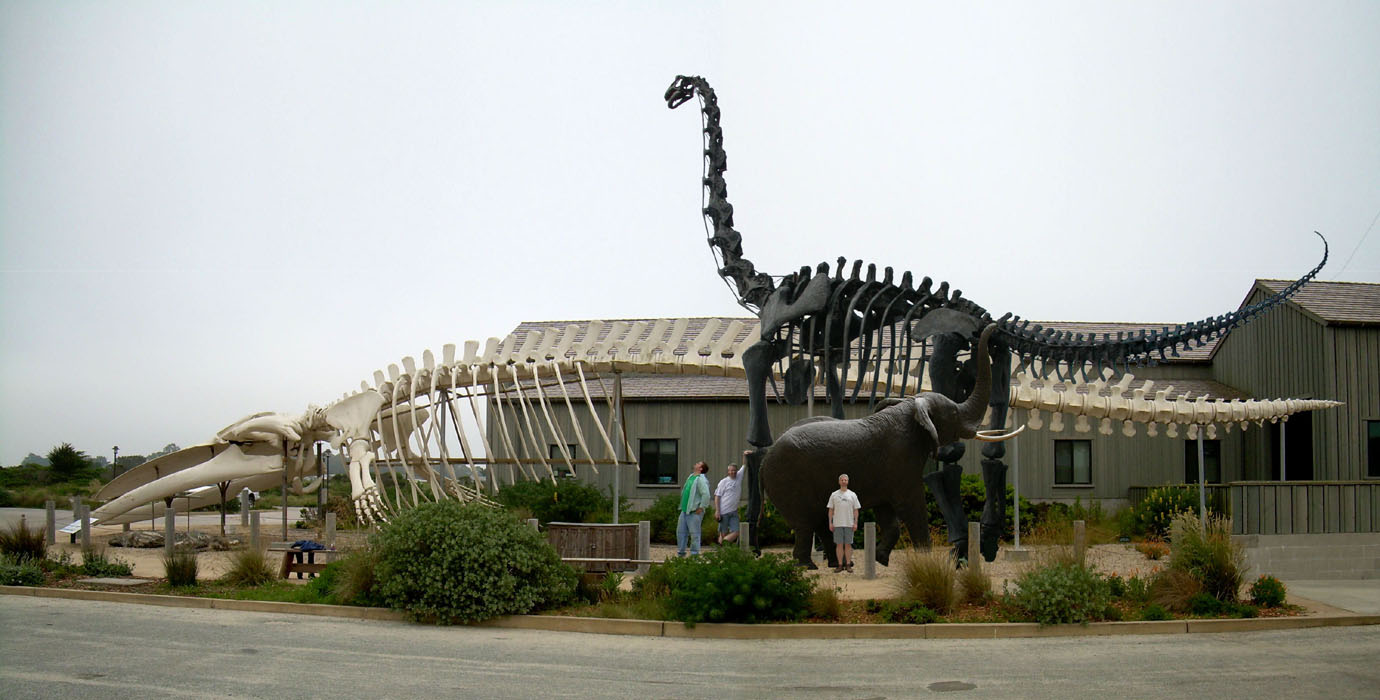
Here are three great tastes that taste great together: Balaenoptera musculus, Brachiosaurus altithorax, and Loxodonta africana. Plus Mike and me for scale. Many thanks to Photoshop for making this happy day possible.

The elephant and brachiosaur are both from the Field Museum in Chicago. Mike and I spent some quality time with them last summer, especially the Brachiosaurus skeleton. It is outdoors, so we could roam around it to our hearts' content, from the time the museum closed until it got too dark to see. One of the things we were trying to figure out is, how much might that animal have weighed?

This is not a trivial problem. Weighing large extant animals is no picnic. Almost all of the heights and weights of big elephants are to some extent estimates. When you shoot an elephant and it flops over, you can measure its length very accurately, but its giant body is no longer being compressed by gravity in the foot-to-shoulder axis and it stretches out some. Also, world record elephants tend to be shot out in the bush, very far from things like truck scales that would allow for accurate weight measurements. Usually the body is hacked up and weighed piecemeal, but there is some inevitable blood loss and so the summed weight of the chunks is not the weight of the animal in life. For both height and weight, a little guesswork is needed to figure out what the real measurement ought to be. The world record elephant was 13'8" lying on its side, and it is estimated to have been about 13'0" when standing. Conveniently, it weighed about 13 tons (these numbers are from the Guinness Book).

Now, using Photoshop and our not-yet-patented "stack of Mike" method, we pegged the mounted bull shown above with a shoulder height of 10 feet. In his paper on dinosaur models, Greg Paul (1997) cites a personal communication from someone at the Field Museum with the information that this animal weighed six tons. Because mass scales with the cube of the linear dimension, a 13-foot-tall elephant should weigh 2.2 times as much as a 10-footer, and indeed, 6 x 2.2 = 13.

One thing that occurred to us was to treat Brachiosaurus like a giant elephant. Brachiosaurus has a long pneumatic neck and the elephant has a big pneumatic head, so you can think of both of them as having a big air-filled mass of bone hanging off the front of their shoulders. In his book A Practical Guide to Vertebrate Mechanics, Chris McGowan gives some figures on a big bull elephant named Tantor. Tantor massed 6500 kg and his head was 750 kg, or a shade over 10% of his total mass. In the same paper mentioned above, Paul (1997) said that in sauropods the neck and head accounted for about 10% of the volume. So our elephant head/sauropod neck comparison is actually pretty close. The sauropod's tail is a bigger problem, but it probably only accounted for about 5% of the animal's mass, and the "stack of Mike" method is sufficiently non-rigorous for 5% error to be acceptable. On the flip side, elephants don't have air sacs or pneumatic postcranial bones, so a big sauropod would certainly have been less dense (but stupider).

BTW, the whale and elephant are in good lateral views, but the brachiosaur is foreshortened and that messes up the apparent proportions. The neck length is actually half again as long as the shoulder height, and the tail is about the same length as the neck. When you look at the composite photo, just imagine that the brachiosaur's tail is sticking out over the asphalt, and is not at all parallel to the whale's backbone.

Using the "stack of Mike" method, we found a shoulder height of 18 feet for the mounted Brachiosaurus. That fit well with what we've seen mentioned other places. If this Brachiosaurus was an elephant, it would have weighed 35 tons (1.8 cubed = 5.832, multiply that by six tons). For such a goofy method, that's a surprisingly satisfying answer. Colbert (1962) and Gunga et al. (1995) used volumetric methods and estimated the mass of Brachiosaurus at 78-80 tons, but in both cases the models are grotesquely obese, more like Macy's parade balloons than real animals. Alexander (1989) got 47 tons, but his model was also too fat, as Paul (1997) very convincingly demonstrated. Russell et al. (1980) used a limb regression equation to put the mass of Brachiosaurus at 15 tons. That just makes no sense. If a 13-foot-tall elephant weighs 13 tons, then an 18-foot-tall Brachiosaurus weighed a damn sight more than 15 tons. Anderson (1985) used limb bone regression and got 29 tons. Paul (1997) used volumetrics and got 32. Henderson (2003) used a digital volumetric model with realistic air sacs and got 26. Our 35 ton estimate is in pretty good company.

When we first cranked through these numbers last July, I wrote to Mike,

We can clearly disregard Russell's 15-ton estimate as crap, and anything over about 40 tons is ludicrous for that skeleton.

To which he replied,

Yes to 15 tonnes. I would not be so quick to dismiss over-forty estimates. Consider where the "shoulder" is. On the elephant, if you're talking about the highest point on the back -- which is a fairer comparison than the elevated head/neck -- then the height is maybe a little less than 10 feet. And it doesn't need to be much less to make a big difference. Six inches shorter, in fact, would bring the BOBA [Boring Old Brachiosaurus Altithorax] estimate up to 41 tonnes. Throw in the tail and I don't find 40 too extreme. (Dude!)

What is there left to say? This is the kind of thing I spend my time thinking about. And it illustrates a couple of points that you should always keep in mind:

1. Big animals are freakin' cool, man.
2. Measuring big animals is a kickass activity.

One last thing. None of the animals in the picture are record-holders. As I mentioned in the last post, the whale is, at 87 feet, about 80% of the size of the largest known individuals. The Brachiosaurus skeleton is about 85% of the size of the largest known specimens in the genus, and the elephant is 77% of the size of the world record. What a pathetic bunch of losers!

JK. They rule. Quite hard.

REFERENCES

Alexander, R.McN. 1989. Dynamics of Dinosaurs & Other Extinct Giants. Columbia University Press, New York, 167 pp.

Anderson, J.F., Hall-Martin, A., and Russell, D.A. 1985. Long-bone circumference and weight in mammals, birds and dinosaurs. Journal of Zoology 207:53-61.

Colbert, E.H. 1962. The weights of dinosaurs. American Museum Novitates 2076:1-16. (FREE online)

Gunga, H.C., Kirsch, K.A., et al. 1995. New data on the dimensions of Brachiosaurus brancai and their physiological implications. Naturwissenschaften 82:190-192.

Henderson, D. M. 2004. Tipsy punters: sauropod dinosaur pneumaticity, buoyancy and aquatic habits. Proceedings, Biological Sciences 271 (Suppl.): S180–S183.

Paul, G.S. 1997. Dinosaur models: the good, the bad, and using them to estimate the mass of dinosaurs. Dinofest International 1997:129-154.

Russell, D.A., Beland, P., and McIntosh, J.S. 1980. Paleoecology of the dinosaurs of Tendaguru. Memoirs de Societe Geologique de France 139:169-175.

Labels: , , , , ,